Unleashing the Power of Spider Curls: A Game-Changer for Arm Development
If you’re looking to sculpt your biceps and enhance your arm definition, look no further than Spider Curls. This specialized exercise targets your biceps with precision, delivering impressive results. In this article, we’ll explore the proper technique, the muscles targeted, and the advantages of incorporating Spider Curls into your workout routine.
Technique and Form: Mastering the Perfect Spider Curls
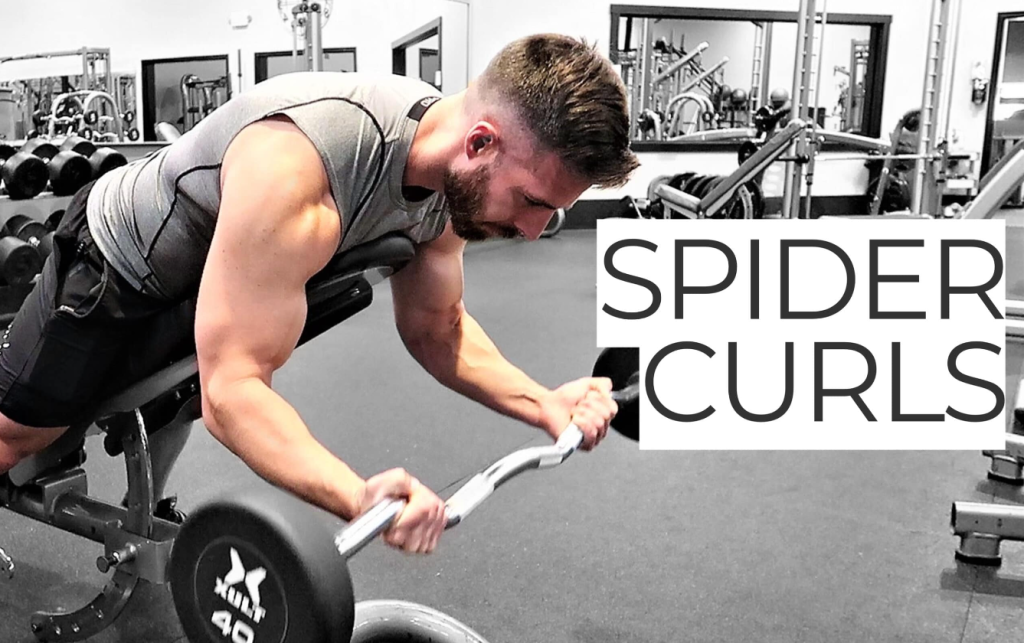
Spider Curls may seem simple, but proper form is essential to maximize muscle engagement and prevent injury. Follow these steps to master the perfect Spider Curl:
a. Set up your bench:
- Position yourself face down on an incline bench, allowing your arms to hang freely.
b. Grip the dumbbells:
- Hold a pair of dumbbells with an underhand grip, ensuring your arms are fully extended.
c. Curl with precision:
- Slowly curl the dumbbells towards your shoulders, contracting your biceps as you lift.
d. Controlled descent:
- Lower the dumbbells back to the starting position in a controlled manner.
e. Mind-muscle connection:
- Focus on the mind-muscle connection, emphasizing the contraction in your biceps throughout the movement.
Remember, avoid swinging your arms or using momentum to lift the weights. Controlled and deliberate movements are key to reaping the full benefits of Spider Curls.
Muscles Targeted: A Bullseye on Your Biceps
The primary target of Spider Curls is the biceps brachii, commonly known as the biceps. As you curl the dumbbells, the biceps contract, lifting the weight against gravity. Additionally, the brachialis and brachioradialis muscles in the forearm act as synergists, assisting the biceps during the exercise.
By isolating the biceps, Spider Curls enable precise muscle engagement, resulting in impressive bicep development and enhanced muscle definition. This exercise also improves the mind-muscle connection, allowing you to better feel and control the contraction in your biceps.
Spider Curls vs. Traditional Bicep Curls: Unraveling the Distinctions
While Spider Curls primarily target the biceps, they differ from traditional bicep curls in several ways. Let’s unravel the distinctions between these two exercises:
a. Range of motion:
- Spider Curls are performed on an incline bench, allowing a more extended range of motion and better stretch at the bottom of the movement, targeting the biceps from a different angle.
b. Muscle isolation:
- Spider Curls provide better isolation of the biceps since the body is stabilized against the incline bench, minimizing swinging or cheating.
c. Preventing shoulder involvement:
- Spider Curls reduce the involvement of the front deltoids (shoulders), focusing the effort solely on the biceps.
d. Load management:
- Due to the limited involvement of other muscle groups, Spider Curls may require lighter weights compared to traditional bicep curls, ensuring effective bicep targeting.
While both exercises are effective for bicep development, incorporating Spider Curls into your routine adds variety and can enhance overall arm gains.
Variations and Equipment: Tailoring Spider Curls to Your Needs
Spider Curls can be performed using various equipment and bench angles, offering flexibility to suit your preferences and fitness level. Here are some Spider Curl variations and equipment options:
a. Preacher Bench Spider Curls:
- Utilize a preacher bench to perform Spider Curls. This variation ensures strict form and isolates the biceps even more effectively.
b. Incline Bench Spider Curls:
- Perform Spider Curls on an incline bench set at different angles to target various parts of the biceps.
c. Dumbbells and Barbells:
- Choose between dumbbells or a barbell to perform Spider Curls based on your comfort and the availability of equipment.
d. Cable Spider Curls:
- Use a low cable pulley to perform cable Spider Curls, providing constant tension throughout the movement.
e. Resistance Bands:
- When equipment is limited, resistance bands can be a great alternative for performing Spider Curls.
With these variations, you can customize your Spider Curls to keep your arm workouts engaging and effective.
Incorporating Spider Curls into Your Workout Routine
To maximize the benefits of Spider Curls, strategically include them in your arm-focused or full-body workout routine. Here are some tips for incorporating Spider Curls:
a. Frequency:
- Perform Spider Curls 1 to 2 times per week to allow ample recovery for your biceps.
b. Sets and Repetitions:
- Aim for 3 to 4 sets of 8 to 12 repetitions per set. Adjust the weight to challenge your muscles while maintaining proper form.
c. Workout Split:
- Incorporate Spider Curls after compound exercises like bench presses or rows. This ensures your biceps are pre-fatigued, leading to better isolation during Spider Curls.
d. Supersets:
- Combine Spider Curls with triceps exercises in supersets to create an efficient arm workout.
Remember, consistency and progression are key to achieving optimal results. As you become more experienced with Spider Curls, consider increasing the weight or altering the bench angle to keep challenging your biceps.
6. Benefits of Spider Curls: Sculpted Arms and More
Spider Curls offer a host of benefits that go beyond simple bicep isolation. Here’s what makes this exercise so powerful:
a. Precise Bicep Targeting:
- Spider Curls enable precise targeting of the biceps, leading to impressive muscle development.
b. Enhanced Muscle Definition:
- As your biceps grow stronger, you’ll notice enhanced muscle definition and shape in your arms.
c. Mind-Muscle Connection:
- The controlled nature of Spider Curls enhances the mind-muscle connection, improving your ability to engage and contract your biceps effectively.
d. Injury Prevention:
- By isolating the biceps and minimizing the involvement of other muscle groups, Spider Curls can reduce the risk of injury during arm workouts.
e. Aesthetically Pleasing Arms:
- Strong and well-defined biceps contribute to aesthetically pleasing arms that boost confidence.

Safety and Precautions: Arm Training Done Right
As with any exercise, safety should always be a top priority. To ensure a safe and effective Spider Curl workout, follow these essential safety tips:
a. Warm-up:
- Before starting your Spider Curls, perform a thorough warm-up to increase blood flow to the muscles and reduce the risk of injury.
b. Start with Light Weights:
- If you’re new to Spider Curls, begin with light weights to get accustomed to the movement and proper form.
c. Controlled Movements:
- Focus on slow and controlled movements during Spider Curls to avoid jerking or swinging the weights.
d. Proper Bench Positioning:
- Adjust the incline bench to a comfortable angle that allows you to maintain stability throughout the exercise.
e. Avoid Overextension:
- Avoid hyperextending your arms at the bottom of the movement, as this can strain the biceps and other structures in the arm.
f. Monitor Your Grip:
- Maintain a firm grip on the dumbbells or barbells to prevent accidents or drop the weights.
g. Listen to Your Body:
- If you experience pain or discomfort during Spider Curls, stop immediately and consult a fitness professional or healthcare provider.
Common Mistakes to Avoid: Getting the Most Out of Spider Curls
To optimize your Spider Curls and avoid potential setbacks, be mindful of these common mistakes:
a. Using Momentum:
- Swinging or using momentum to lift weights reduces the effectiveness of Spider Curls. Focus on controlled, deliberate movements.
b. Neglecting Form:
- Proper form is crucial for isolating the biceps. Avoid cheating by using your shoulders or back to lift weights.
c. Overloading:
- Avoid using excessively heavy weights that compromise your form and risk injury. Focus on proper technique and gradually increase the resistance.
d. Neglecting Full Range of Motion:
- Ensure your biceps go through a full range of motion during Spider Curls to maximize muscle engagement.
e. Relying Solely on Spider Curls:
- While Spider Curls are excellent for bicep targeting, a well-rounded arm workout should include other bicep and tricep exercises for balanced muscle development.
By being aware of these mistakes, you can optimize your Spider Curls and achieve better results in your arm training.
Frequently Asked Questions (FAQs)
-
What are Spider Curls, and how do they differ from regular bicep curls?
Spider Curls are a bicep isolation exercise performed on an incline bench, targeting the biceps from a different angle. They differ from regular bicep curls by minimizing shoulder involvement and providing better bicep isolation.
-
Are Spider Curls suitable for beginners?
Yes, beginners can perform Spider Curls with light weights and proper form to gradually build bicep strength.
-
Can Spider Curls be part of a full-body workout routine?
Yes, you can include Spider Curls in your full-body workout routine, especially if the focus is on arms development.
-
How often should I perform Spider Curls?
Incorporate Spider Curls into your workout routine 1 to 2 times per week for optimal results.
-
Can I perform Spider Curls with resistance bands?
Yes, resistance bands can be used as an alternative to dumbbells or barbells for Spider Curls.
-
What are the benefits of Spider Curls over traditional bicep curls?
Spider Curls provide better isolation of the biceps, focus on the mind-muscle connection, and reduce shoulder involvement, making them highly effective for bicep development.
-
Should I start with a preacher bench or an incline bench for Spider Curls?
Both preacher bench and incline bench variations are effective. Choose based on your comfort and equipment availability.
-
What is the ideal range of motion for Spider Curls?
Aim for a full range of motion, starting with arms fully extended and curling the weights towards your shoulders.
-
Can Spider Curls help me achieve more defined arms?
Yes, Spider Curls are excellent for sculpting the biceps and achieving more defined arm muscles.
-
Can Spider Curls cause wrist pain?
If performed with proper form and grip, Spider Curls should not cause wrist pain. Avoid overextension of the wrists during the exercise.
-
Are there any alternatives to Spider Curls for bicep development?
Yes, other bicep exercises like barbell curls, dumbbell curls, and hammer curls also target the biceps effectively.
-
How can I prevent cheating during Spider Curls?
Focus on controlled movements and avoid using momentum or swinging to lift the weights.
-
Is it necessary to lift heavy weights during Spider Curls?
While heavy weights can be used, proper form and muscle engagement are more important than lifting excessively heavy weights.
-
Can I combine Spider Curls with triceps exercises in my arm workout?
Yes, combining Mastering Spider Curls with triceps exercises in supersets can create an efficient arm workout.
-
Can I perform Spider Curls without an incline bench?
While an incline bench optimizes the exercise, Spider Curls can be modified using alternative surfaces.
-
Can Spider Curls help increase bicep strength?
Yes, Mastering Spider Curls are effective for building bicep strength when performed with progressive resistance.
-
Should I include Spider Curls at the beginning or end of my workout?
Spider Curls can be performed towards the middle or end of your arm workout after compound exercises.
-
Can Spider Curls lead to bicep muscle imbalances?
Balanced programming and incorporating other bicep exercises help prevent muscle imbalances.
-
What are some tips for maintaining stability during Spider Curls?
Maintain a firm grip on the dumbbells, and ensure the incline bench is properly adjusted for stability.
-
Can I perform Spider Curls if I have shoulder issues?
If you have shoulder issues, consult with a healthcare professional before attempting Spider Curls.
The above collection of FAQs covers a range of common questions related to Spider Curls, providing valuable information and guidance to individuals seeking to incorporate this exercise into their workout routine.
10. Tips for Progression and Overcoming Plateaus in Spider Curls
As you advance in your Spider Curls journey, progression becomes essential to continue seeing gains. Here are some tips to overcome plateaus and keep making progress:
a. Increase Resistance Gradually:
- Gradually increase the weight you lift during Spider Curls to challenge your muscles and stimulate growth.
b. Add Extra Reps or Sets:
- Increasing the number of repetitions or sets can provide additional stimulus for muscle development.
c. Modify Bench Angle:
- Adjust the incline bench to different angles to vary the intensity and target different parts of the biceps.
d. Introduce Drop Sets:
- Incorporate drop sets by performing a set with heavier weight, then immediately reducing the weight to continue the set.
e. Mindful Mind-Muscle Connection:
- Focus on fully engaging your biceps during Spider Curls to improve the mind-muscle connection and optimize muscle recruitment.
Addressing the mastering Spider Curls Myths: Separating Fact from Fiction
Despite the effectiveness of Spider Curls, some myths and misconceptions may surface. Let’s debunk common myths surrounding Spider Curls:
a. Myth: Spider Curls lead to bulky arms.
- Fact: Spider Curls primarily sculpt and define the biceps, promoting lean and aesthetically pleasing arms rather than excessive bulk.
b. Myth: Spider Curls cause injury.
- Fact: When performed with proper form and appropriate resistance, Spider Curls are safe and effective for arm development.
c. Myth: Spider Curls are only for bodybuilders.
- Fact: Spider Curls can benefit individuals of all fitness levels, from beginners to advanced athletes, seeking to enhance their arm training.
Incorporating Mastering Spider Curls into Your Workout Program
To ensure that Spider Curls complement your overall fitness goals, consider the following workout program integration:
a. Warm-up:
- Start with a comprehensive warm-up to prepare your muscles for the workout.
b. Compound Exercises:
- Perform compound exercises like bench presses or rows before Spider Curls to pre-fatigue the biceps.
c. Spider Curls:
- Execute Spider Curls according to your chosen variations, focusing on strict form and controlled movements.
d. Triceps Exercises:
- Follow Spider Curls with triceps exercises to create a balanced and effective arm workout.
e. Cool Down and Stretch:
- Complete your arm workout with a cool-down and stretching to promote recovery and flexibility.
Embrace the Power of Mastering Spider Curls
Spider Curls are an invaluable addition to any arm-focused workout routine. By targeting the biceps with precision and isolating muscle groups, Spider Curls enable optimal muscle development and enhanced mind-muscle connection. Whether you’re a beginner or an experienced lifter, incorporating Spider Curls into your fitness journey can unlock the potential for well-defined and strong arms. Embrace the power of Spider Curls, and watch your arm development soar to new heights.
Remember to prioritize safety, proper form, and gradual progression throughout your Spider Curls practice. With dedication and consistency, you can achieve your arm goals and revel in the satisfaction of sculpted biceps and defined arms.


