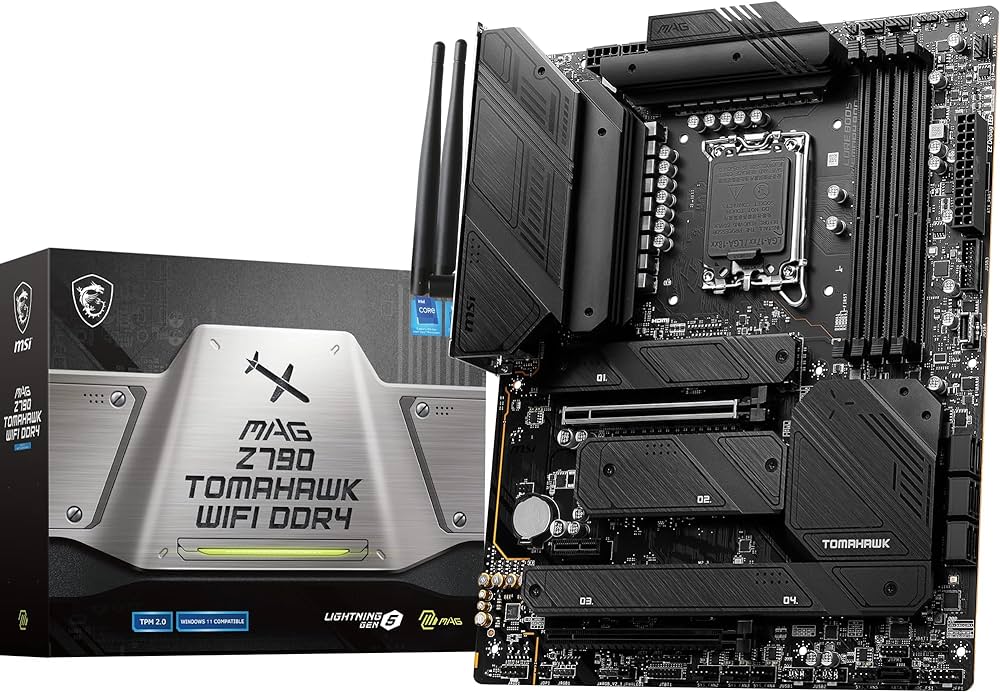
MSI MAG Z790 Tomahawk: Unleashing High-Performance Gaming
In the ever-evolving world of gaming and PC enthusiasts, having the right hardware can make all the difference. Your motherboard, in particular, serves as the backbone of your gaming rig, dictating its performance, expandability, and overall capabilities. Among the many options available, the MSI MAG Z790 Tomahawk stands out as a powerhouse, designed to cater to the demands of modern gamers and PC builders.

Introduction to the MSI MAG Z790 Tomahawk
When it comes to building a gaming PC, selecting the right motherboard is paramount. The MSI MAG Z790 Tomahawk, part of MSI’s MAG series, has garnered significant attention for its impressive features and capabilities. But what makes this motherboard a top choice for gamers and PC enthusiasts?
The MAG Z790 Tomahawk embodies the perfect blend of cutting-edge technology and user-centric design. With support for the latest CPUs, lightning-fast RAM, and a host of gaming-specific features, it promises to elevate your gaming experience to new heights.
In this comprehensive guide, we’ll dive deep into the world of the MSI MAG Z790 Tomahawk, exploring its key features, benefits, and why it’s a compelling choice for anyone seeking top-tier gaming performance.
Benefits of Choosing the MSI MAG Z790 Tomahawk
The MSI MAG Z790 Tomahawk isn’t just another motherboard; it’s a game-changer. Here are some of the compelling benefits that make it a standout choice for gamers and PC enthusiasts:
Uncompromised Gaming Performance
At the heart of the MSI MAG Z790 Tomahawk is its dedication to providing unmatched gaming performance. Whether you’re diving into the latest AAA titles or engaging in competitive eSports, this motherboard ensures that your gaming experience is smooth and immersive.
The support for high-speed RAM and PCIe 4.0 means that your system can handle data-intensive tasks without breaking a sweat. Load times are reduced, and in-game frame rates are optimized for an exceptional gaming experience.
Overclocking Made Easy
For those who like to push their hardware to the limits, the MSI MAG Z790 Tomahawk offers a user-friendly overclocking experience. With robust power delivery and BIOS features designed for enthusiasts, you can unleash the full potential of your CPU and RAM.
Overclocking isn’t just about raw power; it’s about achieving the perfect balance between performance and stability. The MSI MAG Z790 Tomahawk lets you fine-tune your settings to achieve that sweet spot.
Installation and Setup
Installing the MSI MAG Z790 Tomahawk motherboard is a straightforward process, but it’s essential to follow the steps carefully to ensure a smooth setup. Here’s a step-by-step guide to help you get started:
Step 1: Gather Your Components
Before you begin, make sure you have all the necessary components ready:
MSI MAG Z790 Tomahawk motherboard
Compatible CPU
RAM sticks
Graphics card (GPU)
Storage devices (NVMe SSD, SATA SSD/HDD)
Power supply unit (PSU)
The case for your PC
Screwdriver
Anti-static wrist strap (recommended)
Step 2: Prepare Your Workspace
Find a clean, well-lit workspace with ample room to assemble your PC components. Ensure the area is free of static electricity by wearing an anti-static wrist strap and working on a non-static surface.
Step 3: Install the CPU
Open the CPU socket on the motherboard by lifting the retention arm.
Align the notches on the CPU with the corresponding notches on the socket.
Gently lower the CPU into the socket without applying force.
Lower the retention arm to secure the CPU in place.
Step 4: Install RAM Modules
Locate the RAM slots on the motherboard.
Open the retention clips on the RAM slots by pushing them outward.
Align the notches on the RAM sticks with the notches in the slots.
Insert the RAM sticks into the slots, applying even pressure until they click into place.
Close the retention clips to secure the RAM.
Step 5: Install the Motherboard in the Case
Place the motherboard in the PC case, aligning the mounting holes with the standoffs in the case.
Use screws to secure the motherboard to the standoffs, ensuring it’s firmly in place.
Step 6: Connect Power and Data Cables
Connect the main 24-pin ATX power connector from the PSU to the motherboard.
Connect the CPU power cable (usually 8-pin or 4+4-pin) to the motherboard.
Connect the PCIe power connectors to the graphics card (if applicable).
Connect SATA data and power cables to your storage devices.
Connect case fans and front panel connectors (power button, reset button, LEDs, etc.) to the motherboard.
Step 7: Check Connections and Cable Management
Double-check all connections to ensure they are secure. Neatly route and manage cables to improve airflow and maintain a clean look inside your case.
Step 8: Close the Case
Put the side panel back on your PC case and secure it with screws. Ensure all connections are secure before powering on your system.
Step 9: BIOS Setup
Boot your system and enter the BIOS/UEFI settings by pressing the designated key (usually Del, F2, or F12) during startup. Configure settings such as boot order, XMP profile for RAM, and CPU settings as needed.
Step 10: Install Operating System
Install your preferred operating system and drivers to complete the setup process.
Frequently Asked Questions about the MSI MAG Z790 Tomahawk Motherboard
1. Is the MSI MAG Z790 Tomahawk motherboard compatible with Intel processors?
Yes, the MSI MAG Z790 Tomahawk motherboard is compatible with 10th and 11th Gen Intel Core processors.
2. Does this motherboard support high-speed RAM for gaming?
Absolutely. The MSI MAG Z790 Tomahawk supports high-speed DDR4 RAM, offering excellent gaming performance.
3. Can I overclock my CPU with this motherboard?
Yes, this motherboard provides overclocking features, allowing you to push your CPU for higher performance.
4. What GPUs are compatible with the MSI MAG Z790 Tomahawk?
It supports a wide range of graphics cards, including those from NVIDIA and AMD, thanks to PCIe 4.0 slots.
5. How many RAM slots does this motherboard have, and what’s the maximum RAM capacity?
The motherboard typically has four RAM slots and can support a significant amount of RAM, depending on the specific model.
6. Does it support NVMe SSDs for fast storage?
Yes, the MSI MAG Z790 Tomahawk supports M.2 NVMe SSDs, offering lightning-fast storage options.
7. Can I use traditional SATA drives with this motherboard?
Yes, in addition to NVMe SSDs, you can use traditional SATA SSDs or HDDs for storage.
8. Does this motherboard have Mystic Light RGB customization?
Yes, it features Mystic Light RGB lighting, allowing you to personalize your gaming setup with various colors and effects.
9. Is the MSI MAG Z790 Tomahawk easy to install for beginners?
Many users find it user-friendly and suitable for those new to PC building, thanks to its labeled connectors and clear layout.
10. What kind of customer support does MSI offer for this motherboard?
MSI typically provides customer support for technical issues and warranty claims, offering assistance when needed.
Conclusion
The MSI MAG Z790 Tomahawk motherboard is a powerhouse designed for gamers and PC enthusiasts who demand top-tier performance, reliability, and customization options. From its support for high-speed RAM and PCIe 4.0 to its user-friendly overclocking features and Mystic Light RGB customization, this motherboard offers a comprehensive gaming experience.
Whether you’re building a new gaming rig or upgrading your existing setup, the MSI MAG Z790 Tomahawk provides the compatibility, expandability, and future-proofing you need to stay at the forefront of gaming technology.


